Working with MySQL databases
Create a new MySQL database
- Log in to your Hosting Dashboard.

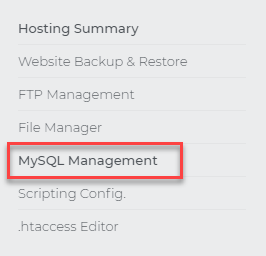
- In the left sidebar, click MySQL Management.
- Click on Add MySQL Database.

- Name your new database.

- Set a new username and password for your new database. Keep the username and database name as close to identical as possible. The username cannot be more than 16 characters long.

- Configure the database privileges.

- Save, and your new database will be created.
Database Naming Pro Tips
- Use lowercase - this will help avoid mistakes due to case-sensitivity.
- No spaces - use underscore instead
- No numbers - use only alpha English characters
- Use valid understandable names like blog, wordpress, ecommerce, store Name should be self-explanatory
- Database name should not be more than 64 characters
- Avoid using prefix
To manage a MySQL database from phpMyAdmin:
- Log in to your Hosting Dashboard.
- In the left sidebar, click MySQL Management.
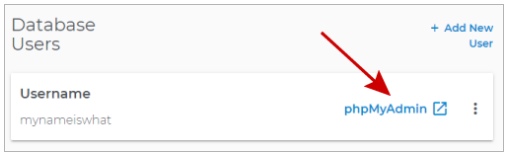
- Click Manage on the database you want to access.

- Click on phpMyAdmin for the selected database.
- You now have access to phpMyAdmin for your database.

Backup a MySQL database
To create an on-demand MySQL database backup (all tables):
- Log in to your Hosting Dashboard.
- In the left sidebar, click MySQL Management.
- Click Manage on the database you want to access.
- Then click on phpMyAdmin for the selected database.
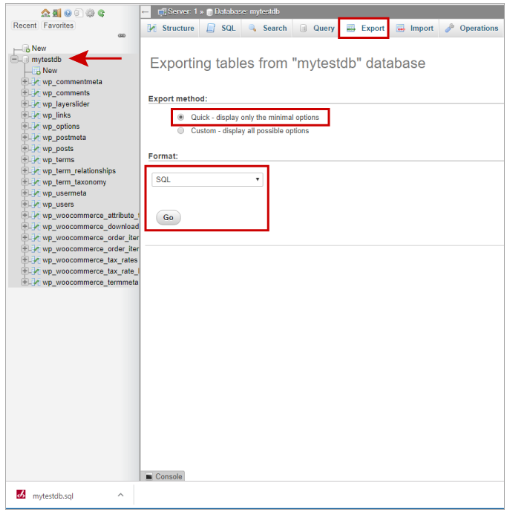
- With your database selected in the left pane:
- Click on the Export tab
- The quick method will export all tables
- Format SQL and Go
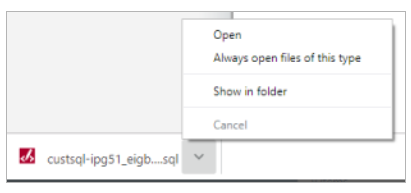
- Your database is available for download and other options.
To schedule specific tables in a database for an on-demand backup
- Log in to your Hosting Dashboard.
- In the left sidebar, click MySQL Management.
- Click Manage on the database you want to access.
- Then click on phpMyAdmin for the selected database.
- With your database selected in the left pane:
- Click on the Export tab
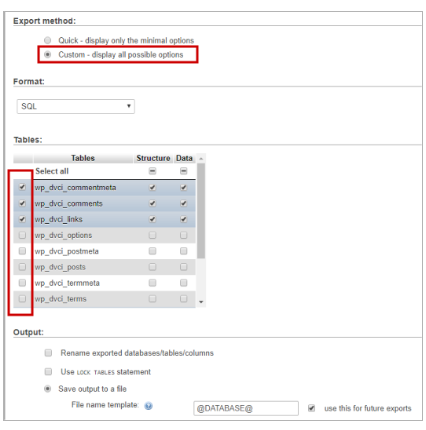
- Change the Export method to Custom
- Select the tables you want to Export
- Change any other Export options
- Format SQL and Go
- Your database is available for download and other options.
Delete or drop a MySQL database
- Log in to your Hosting Dashboard.
- In the left sidebar, click MySQL Management.
- Click the garbage can icon.

- Verify that you are dropping the selected database, and click Delete Database.
Warning: Once a database is dropped, this action is irreversible, and all data stored in the database is lost.
Can't schedule a MySQL database backup
Problem: When you go to the MySQL Beta -> Manage Backups tab and click a database name to schedule it for backup, nothing happens.
Why is this happening: The server is trying to post an error, and it's not being displayed. The error says: Server is busy. Please try again later.
Solution: Please try to schedule your database backup later.
Related Articles: